Semiconductor Die Collet Adjustment Using Fuji Prescale
Keywords: : die collet, die collet adjustment, repairing die collet transporters, semiconductor suction jig problems, alignment measurement of die collet, suction nozzle alignmentSummary: Die Collets (or suction jigs) are excellent tools for transporting semiconductor chips. But suction nozzles eventually need replacement which may result in mis-aligned die collet that may cause defective products and material loss. Using Fuji Prescale films, maintenance technicians can easily measure the die collet alignment and repair the problem without loss of production units.
Written by Igor Mateski
Die Collet in Semiconductor Manufacturing
Semiconductor manufacturing grows more precise as Moore's Law proves true and we witness doubling of transistor count every 18 months. This rapid growth required reducing the wafer thickness and reducing power consumption. As wafers grow thinner, producing chips without defects is becoming a daunting task.
Perhaps the single crucial step in the chip manufacturing is when the wafer is physically manipulated before its encasement in a chip body. While cutters can cut safely away from the wafer-printed surface, when it comes to move the actual chip into a lead frame (LF), the die collet (suction jig) physically touches the chip to transport it from the cutting area onto the LF.
Potential Die Collet Issues
When the cut out chips are moved onto their lead frames, each transported unit is a potential break-down moment as the die collet uses physical contact and vacuum to move the chip. Since chips grow ever-smaller and thinner, they become more and more fragile and susceptible to mechanical damage.
If the suction nozzle is not perfectly aligned with the cutting plane chips can be broken or damaged. The problem with this manufacturing step is that if a defective nozzle is not discovered on time, the factory may lose many good chips because of a simple misalignment and poor tactile pressure distribution between the suction nozzle and the chip surface.
Usually, Quality Assurance happens after the chip is enclosed and in high-yield manufacturing, many batches may be discarded which is costly as well as a logistical problem when manufacturing demand is high.
Adjusting Die Collets with Fuji Prescale
When maintenance technicians test for die collet problem they usually use a retrospective approach by testing already manufactured chips. The problem with this approach is that in high-yield processes there may be thousands of manufactured chips that are in fact defective. As the pressure distribution between the suction nozzle and chip surface is quite small and susceptible to misbalance, it is quite difficult to quickly notice a problem during manufacturing.
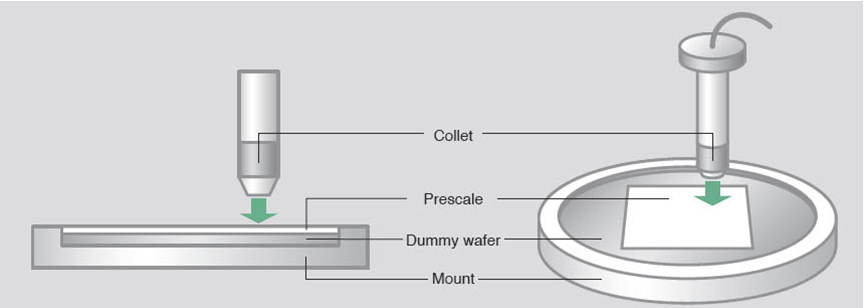
The only option for repair technicians to quickly discover any tactile pressure misbalance is to use the Ultra Super Low Fuji Prescale Film (LLLW and LLW series) and run often on-the-fly tests. Below is an illustration of how the Fuji Prescale film can be used to test for semiconductor die collet adjustment issues.

To use the Fuji Prescale Film, technicians should follow these steps:
- Create a supporting plate-shaped wafer that will have the nominal thickness when joined with the 200 µm-thick Fuji Prescale Film (Supporting Wafer Thickness+ Fuji Thickness= Nominal Die Thickness)
- When the suction nozzle is replaced, use the supporting wafer, place the Fuji Prescale film and run a single suction action with the new nozzle
- Check the developed Prescale film for uniformity of the tactile pressure distribution
Below is an image of a developed Fuji Prescale Film that shows a defective and correct nozzle alignment

The image on the left is from a poorly adjusted suction nozzle. This suction jig will definitely damage the chips during transportation and will be responsible for hundreds of defective chips.
Thanks to the Fuji Prescale Film, technicians can identify the problem immediately and run the necessary nozzle adjustments and run the alignment test as many times as necessary until the end result is an even tactile pressure distribution, as shown on the image on the right.
